Sunday 25 February 2018

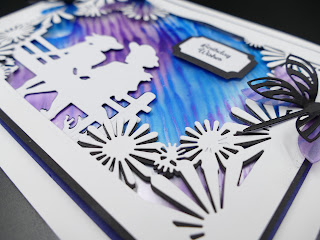
Gerbera Rectangle


 This card started out quite differently to how it has finished up! 
I was very lucky to attend a workshop recently with John Lockwood where we were using some of the Gerbera Collection dies including the rectangle. We also had the chance to get messy, well some of us got messy, others did not and others used rubber gloves! 
The background and the back of the dragonflies were made with acetate and the Izink Pigment ink bottles, such a simple technique and everyone had a different look depending on which colour inks they chose.

The Gerbera rectangle was cut twice, once in white and then again in black for the shadow effect

I have then used the JoyCrafts Friendship Bench die and again, cut it twice once in black and once in white. This range is from the Deboss and Cut collection, so it needs to go through the machine with an embossing mat to get the full detail

The dragonflies are just stunning and the delicacy of the acetate background with the colours that I chose quite finished it off.


Items available on the website Maximumcrafts

Sunday 18 February 2018

Spotlight on Flora


Spotlight on Flora

As soon as I saw the new release collection in January, I knew I just had to have Flora in my life.
She must be one of the most delicate dies ever. I have seen cards using the negative of the die (the spcae on the card where the die has been cut from) but the die itself has such pretty detail it just had to be.

The card base is a 7" square. The card used is is Foundations Bright White and Crafts Too Rosa Lustre card, the sheen is so lovely, one of my favourite colours too!

I have used the Double Stitched Octagon set to frame Flora, the shapes seem to suit each other Four dies used altogether to create the look. Take four dies from the set all next to each other. If you count the dies as largest number 1 and smallest of the set number 4, take dies number 1 and 4 and cut from Bright White card. Take dies numbers 2 and 3 and cut from Rosa card. Use the 'waste' octagon shape from this for the background of Flora

To make a beautiful subtle background, I have stamped various sizes of the Passionflower stamp set all around the edge of a 6.5" square piece of white card, in Izink ink Framboise and Metallic Silver. This gives a subtle finish to the background. I found a plain background was too stark for such a delicate die such as Flora.

Finally I used another couple of Double Stitched Octagons for the sentiment point and popped them up with some foam pads behind. A little gem in each of Flora's tiny flowers and there you go!
Flora and Passionflower stamps are on offer today over on the website www.maximumcrafts.com

Sunday 11 February 2018

Book Easel Card Instructions


Prepare for a 'Photo Overload'

As requested, today we have a detailed description of how to make this Book easel card with loads of photos so you can see as well as read how to go about making this simple but eye catching design


First of all, take your blank card base, in this case, its 14.5cm x 14.5cm

Open the card base up and along the front of the card measure half way at 7.25cm and score along that line

Fold along the score line

Cut a piece of card, in this case silver mirri card to 14cm x 14cm and then a piece of white card 13.5cm x 13.5cm . Emboss the piece of white card and layer these two together for the inner card

In this card I have used the Small Book die set from Presscuts and chosen the largest die and the next size down for the book itself. Using the largest die, cut one piece from silver mirri card and the next size, cut one piece from white card and emboss this piece. Keeping the silver layer flat, I have then gently curved the white layer and added a thin layer of Dries Clear glue down the centre only and stuck this to the silver layer, forming the book.

Using the same glue, I have then added glue to the folded section of the card and stuck the book to this section, as in this photo


To give a 'stopping point' for the book, I have taken a piece of silver Mirri card 10.5cm x 3.5cm and white card 10cm x 3cm, stuck these together and added foam to the back, so giving a raised piece. The sentiment is then added to this


Finally, using the Champagne Flute die set and Crystal strips I have decorated the card


Sunday 4 February 2018

My Secret Garden


Todays card includes some different techniques, I suppose you could say some alternative techniques. 
I have used the Creative Expressions Ivy Garden die set, the detail is, as always, quite superb. Instead of simply cutting the ivy corners out and sticking them straight down, I have 'quilted' them.

Using double sided adhesive sheets, I have cut the corners from a white piece of card and then again from the olive card. With the adhesive sheet behind, I have simply embedded the green ivy into the space left on the white card. Gives a lovely effect.


So many crafters have issues with colouring stamped images. To overcome this with the Secret Garden stamp, I have simply stamped it three times. Twice with Perfect Medium onto white card and embossing with Detail Gold embossing Powder and then, using black ink, onto a piece of the Olive Lustre card. I have then paper pieced the flowers and bird house. Finally, I have cut another ivy corner out and chopped it about a bit and placed randomly on the image


Kit available in February here Maximumcraft Monthly card kit 

Sunset in Africa

Sunset In Africa I really enjoyed making this card, its so different and yet quite simple to achieve with the combination of the ...