Monday 20 August 2018

Flower Eclipse card Tutorial


Simple but stunning, follow the simple step by step photos to produce this version of an Eclipse card

I started with a base card of 8" or 20cm. From Black card cut one piece 19.5cm x 19.5cm.
From white card, cut one piece 19cm x 19cm.
As the stamp used is a large one, I used a Stamping Platform for a perfect image.
First, I took two Stitched Oval dies and placed them into position on the white card layer to see where I was going to place the stamp
 I gently placed the image on top of the dies and then closed the platform to pick up the stamp. I then removed the dies for now and inked up the image in black ink

Using, in this case, Graphmaster marker pens, but any colouring pens of your choice, I coloured the image

Picking out the green leaves first, and then choose a couple of favourite colours 
I have kept the colouring to a very simple effort, no shading, just colouring but if you prefer, you can go to town

Place the Oval dies over the image and using Removable tape, tape in place and run through your die cutting machine
Add dreis clear glue to back of the black card layer and stick to card front

Take the die cut pieces out of  your coloured layer and apply glue, including close to the aperture to ensure it all sticks down flat

Take the oval frame and add foam pads to the back, I prefer a 'deeper' frame so I go round twice with the pads, adding the second row on top of the first like this

Add a spot of glue to the pads and carefully line up the image before sticking down, this is how NOT to do it

and this is HOW to do it

Take the centre piece, choose a sentiment and I then popped it back into the Stamping Platform to make be sure the image was clear 

This then needs to be stuck in the centre. I have used a butterfly from John Next Door Large Butterfly set and coloured in the base butterfly with one of the colour markers I used for the flowers, just to coordinate

I popped a pearl flower centre into the largest flower to finish

Items used
Mixed Bunch stamp set available here
Presscuts Stitched Oval die set here

Why not try another stamp or another shape die set

Items used
Bold Fiona Stamp set here
Presscuts Stitched Squares die set here


Sunday 19 August 2018

Festive Collection 2018 Netted Star Background


Showcasing the Festive Collection 2018 Netted Star Background die today. An expandable pattern as there is no outside edge so you can make a much bigger card than this 7" square one that I have, even a rectangle instead of a square!

I have taken a piece of Honeydew Lustre card and cut the Netted Background from this. I have used a double sided adhesive sheet onto a white piece of card, removing the protective sheet and then popped the netted background on top. This both ensures all the delicate detail is firmly stuck to the background and gives a perfect sticky surface to sprinkle Cosmic Shimmer Diamond Sprinkles on to.

For the sentiment I have used one of the Festive Tags die from the John Next Door range

Finally a closeup of the poinsettia, quite possibly my favourite design for the poinsettia dies that I have worked with. This is using the Poinsettia and matching stamp set from the John Next Door Festive collection, with a touch of Swirly Ivy again from John


The Festive Collection Netted Star background die 

Sunday 12 August 2018

Sweet Dixie


The Sweet Dixie dies are always very detailed and lend themselves to very simple cards with little effort, sounds good to me!

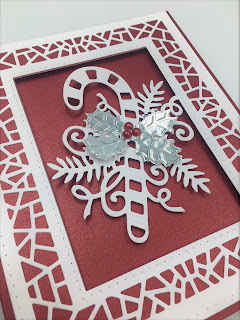
I have used the Sue Wilson Mosaic Bauble background die set to make the outer frame, cut from Ice Silver Lustre card, then I have used the same dies without the middle mosaic one to create the background frame cut from Cherry Red Lustre card. The Fancy Candy cane is cut from the Ice Silver card once and then a second time from silver mirror card so that I could trim just the holly leaves and pop on top of the ice silver cane.

The second sweet Dixie card is the Delicate Holly Wreath die set which has 3 dies in the set

It really is a delicate wreath

The set comes with the wreath , the bow and a little star which I have not used in this design
I have simply cut the wreath out twice, once in white and once in silver mirror card and then snipped the holly from the silver card and then added on top of the holly in the white wreath and added a few red glitter gems.
The circle and square die stitched dies are the Presscut range

The two die sets together are on special offer on 12th August here Maximumcrafts.com

Sunset in Africa

Sunset In Africa I really enjoyed making this card, its so different and yet quite simple to achieve with the combination of the ...