Sunday, 11 November 2018

Sunset in Africa


Sunset In Africa


I really enjoyed making this card, its so different and yet quite simple to achieve with the combination of the die sets that have been used.

I started with a piece of Ivory Foundation card and cut this to 19cm x 19cm. Using That Special Touch Mask - Crackle, I place it in each corner and using a stipple brush, added Distress Ink in Spiced Marmalade, Tea Dye and Wild Honey which gave the effect of the giraffe hide.

For the frame, I chose the Classic Adorned Hexagon die set and added foam tape to the back of the outer frame to give a depth to the card

Once that was done, I could then see where I wanted the 'Sun' to be. I cut a circle out from scrap card and used removable tape to attach in the centre of the framed area and using the same Distress ink colours and the stipple brush, built up the 'sky'. I removed the circle and swished the brush over the sun a few times to blend it in.


The Safari Collection has a selection of African Animals in one set and then the landscape dies and sentiments in the other set. There is also a matching stamp set for the animals but I didn't want to use them in this project. The detail on the animals is incredible and well worthwhile to run the die through twice to emboss the details, makes all the difference as you can see in this photo

This card is a perfect 'manly' card but equally suitable for animal lovers of any age for any occasion
 

All items available on the website here Maximumcrafts


Sunday, 21 October 2018

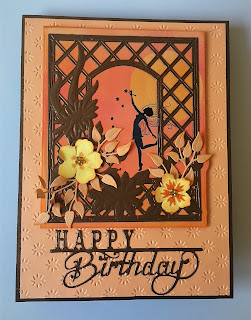
Garden Delight


Introducing a little Garden Delight today. 
I would love to have a trellis covered in beautiful flowers in my garden just like this, so pretty!
This die set has three dies in total - the main trellis die, an outer edge and the sentiment


I have used Copper Pearl Foundation card with Feltmark Soft Salmon, with a few scraps extra for the flowers.

For the background, I took a piece of Soft Salmon card and a couple of Distress inks - Squeezed Lemonade and Spiced Marmalade. I started with a quick application of the Squeezed Lemonade onto the card then I masked off a circle in the corner of the piece of card, so that this would be my 'sun'.
Added a blend of the Distress inks and then cut out using the outer die.
The trellis die was then run through with the copper card and again, just using scraps of lemon card over the two flowers which were sponged with Spiced Marmalade whilst still in the die and around the edges once out.

I added JND Starflower leaves cut from the Soft Salmon. Stamped a delicate little Nellie Snellen fairy in Archival Ink after working out just where she needed to go of course.
Something a little different for this lovely die set, hope you like it 

Sunday, 23 September 2018

Happiness is......


Happiness is ........

A very easy card today, the sentiment with the delicate Butterfly corner die doesnt really need much work to make a stunning little card

The card is a 6" scalloped card blank. I have then added a 14cm x 14cm Periwinkle Foundation card layer

The next layer is actually two layers, a layer of white card 13.5cm x 13.5cm covered with the same size layer of double sided adhesive sheet. Peel the top layer of and covered with Rangers Dry Glitter for a very subtle sparkle. The sentiment is stamped in Rangers Cobalt ink and cut with JND Square Media die set

The corner has been cut twice from Sapphire Lustre card, the second piece has simply been trimmed down to just the butterfly again and popped it directly on top of the other one by just the centre body so that the wings can be slightly lifted


Available on the website Maximumcrafts

Wednesday, 19 September 2018

Z Fold Christmas Village


The Snow Scene die set from the John Next Door range lends itself perfectly to this Z fold style card.
Despite looking a bit technical, its really simple and yet very effective so here is a little tutorial for you
First of all take an A4 sheet of card cut along the long edge at 10"

Along that same long edge, score at 5" and 2.5"

Turn the card 90 degrees and cut at 5", leaving you two scored pieces. The largest is the base card and the smaller is for the snow scene

I have then taken a piece of Sapphire Lustre card and cut one piece 4.75" x 4.75" and two pieces 4.75" x 2.25". Using the Snowdrop embossing folder I have run these pieces through giving a snowy effect. Use a sandpaper scrub to remove the top surface showing the white core giving an even more snowy look 

Add panels to the card base. 
Take two of the Snow Scene dies and place as shown. It is important to put the dies in the correct place with the outer edge on the edge of the card. They dont quite meet in the middle but are very easy to trim.


I have then cut another snow scene to put on the back of the card 

The village is now ready to stick to the card base 

You simply attach the first half of the front village scene to the first panel and the far right panel to the far right corner of the base card. This is how is looks folded flat

and this is how it looks folded up, fitting into a 5" square envelope.
I have used the JND Happy Snowflake die set for the sentiment and snowflakes

All products available on the website www.maximumcrafts.com 

Monday, 20 August 2018

Flower Eclipse card Tutorial


Simple but stunning, follow the simple step by step photos to produce this version of an Eclipse card

I started with a base card of 8" or 20cm. From Black card cut one piece 19.5cm x 19.5cm.
From white card, cut one piece 19cm x 19cm.
As the stamp used is a large one, I used a Stamping Platform for a perfect image.
First, I took two Stitched Oval dies and placed them into position on the white card layer to see where I was going to place the stamp
 I gently placed the image on top of the dies and then closed the platform to pick up the stamp. I then removed the dies for now and inked up the image in black ink

Using, in this case, Graphmaster marker pens, but any colouring pens of your choice, I coloured the image

Picking out the green leaves first, and then choose a couple of favourite colours 
I have kept the colouring to a very simple effort, no shading, just colouring but if you prefer, you can go to town

Place the Oval dies over the image and using Removable tape, tape in place and run through your die cutting machine
Add dreis clear glue to back of the black card layer and stick to card front

Take the die cut pieces out of  your coloured layer and apply glue, including close to the aperture to ensure it all sticks down flat

Take the oval frame and add foam pads to the back, I prefer a 'deeper' frame so I go round twice with the pads, adding the second row on top of the first like this

Add a spot of glue to the pads and carefully line up the image before sticking down, this is how NOT to do it

and this is HOW to do it

Take the centre piece, choose a sentiment and I then popped it back into the Stamping Platform to make be sure the image was clear 

This then needs to be stuck in the centre. I have used a butterfly from John Next Door Large Butterfly set and coloured in the base butterfly with one of the colour markers I used for the flowers, just to coordinate

I popped a pearl flower centre into the largest flower to finish

Items used
Mixed Bunch stamp set available here
Presscuts Stitched Oval die set here

Why not try another stamp or another shape die set

Items used
Bold Fiona Stamp set here
Presscuts Stitched Squares die set here


Sunday, 19 August 2018

Festive Collection 2018 Netted Star Background


Showcasing the Festive Collection 2018 Netted Star Background die today. An expandable pattern as there is no outside edge so you can make a much bigger card than this 7" square one that I have, even a rectangle instead of a square!

I have taken a piece of Honeydew Lustre card and cut the Netted Background from this. I have used a double sided adhesive sheet onto a white piece of card, removing the protective sheet and then popped the netted background on top. This both ensures all the delicate detail is firmly stuck to the background and gives a perfect sticky surface to sprinkle Cosmic Shimmer Diamond Sprinkles on to.

For the sentiment I have used one of the Festive Tags die from the John Next Door range

Finally a closeup of the poinsettia, quite possibly my favourite design for the poinsettia dies that I have worked with. This is using the Poinsettia and matching stamp set from the John Next Door Festive collection, with a touch of Swirly Ivy again from John


The Festive Collection Netted Star background die 

Sunset in Africa

Sunset In Africa I really enjoyed making this card, its so different and yet quite simple to achieve with the combination of the ...